
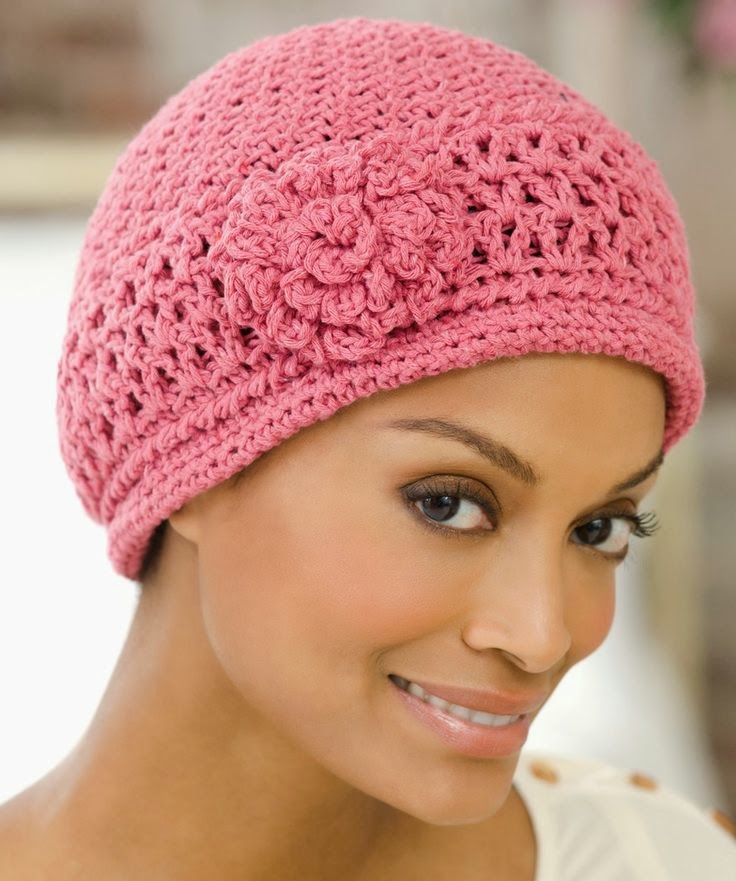
Shabby Chic Blossom Hat for Baby
Sarah Cooper Copyright 2009
Materiale:
- croseta nr 3 (depinde de grosimea firului)
Abrevieri:
- ch= chain= ochi de lant;
- slst= sleep stitch- piciorus alunecat sau orb
- dc- double crochet = piciorus dublu
INCEPEM :
Crosetam caciula din varful capului spre frunte.
Incepem randul intotdeauna, cu ch3 care inlocuieste 1 dc si incheiem randul cu slst ce uneste primul si ultimul ochi.
Ch4, unim primul si ultimul ochi printr-un slst . Formam un inel.
R1,In inelul format crosetam Ch3, 11dc . Unim primul si ultimul ochi cu Slst . (12dc)
R2 Ch3, Dupa modelul " DC in the Back Loop Only" , crosetam 2dc in fiecare dc din randul anterior.Unim primul si ultimul dc cu Slst . (24dc)
R3 : Dupa modelul " DC in the Back Loop Only" , 1dc in urmatorul ochi , 2dc in acelasi ochi) x 6 . Unim primul si ultimul ochi
cu Slst . (36dc)
R4 : Dupa modelul " DC in the Back Loop Only" , 2 dc in urmatoarele 2 ochiuri, 2dc in acelasi ochi) x 6 . Unim
primul si ultimul ochi
cu Slst . (48dc)
R5 : Dupa modelul " DC in the Back Loop Only" , 3 dc in urmatoarele 3 ochiuri, 2dc in acelasi ochi) x 6 . Unim
primul si ultimul ochi
cu Slst . (60dc)
R6-12: Dupa modelul " DC in the Back Loop Only" ,1 dc in fiecare ochi .
Unim
primul si ultimul ochi
cu Slst . (60dc per rand)
Petalele
R13: ch1, sc in acelasi ochi ca ch1.* Sarim urmatorul ochi,in urmatorul ochi crosetam [3dc, ch2, 3dc] (petal) , sarim urmatorul ochi, sc in urmatorul ochi. * Repetam intre * pana la sfarsitul randului. Unim primul si ultimul ochi cu slst..
(Vom avea 15 petale) .
Urmatoarele petale le vom croseta in R5, R6, R7, R8, R9, R10, si R11 dupa modelul " DC in the Front Loop Only" .
Puteți repeta rândul de petale de câte ori doriți. În fotografie , s-a crosetat un rând între rândurile de petale. In fotografie, rândurile de petale apar în R11, R9, R7, și R5.
2. Scheme caciuli:

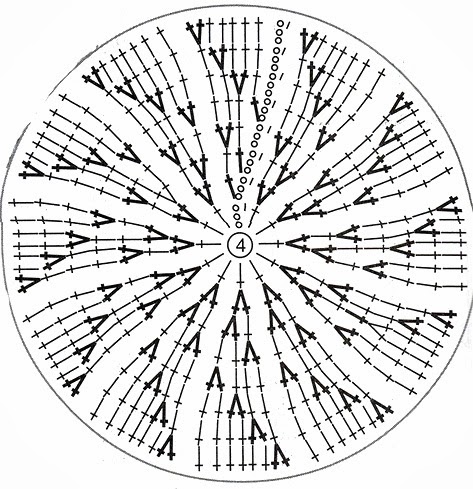
2.

2a.
Abbreviations:
ch – chain
dc – double crochet
sc – single crochet
sc2tog – single crochet 2 together (Here is a video tutorial by Moogly to help if you need it).
sl st – slip stitch
dc – double crochet
sc – single crochet
sc2tog – single crochet 2 together (Here is a video tutorial by Moogly to help if you need it).
sl st – slip stitch
Special
Stitches:
3 dc puff stitch – (YO, insert hook in same stitch, yo, draw yarn through st, yo, draw yarn through 2 loops on hook) 3 times in same st, yo draw through remaining 4 loops on hook.
3 dc puff stitch – (YO, insert hook in same stitch, yo, draw yarn through st, yo, draw yarn through 2 loops on hook) 3 times in same st, yo draw through remaining 4 loops on hook.
Sc2tog – Insert hook in next stitch, yarn over and pull up loop
(2 loops on hook), insert hook in next stitch, yarn over and pull up loop (3
loops on hook), yarn over and draw through all 3 loops on hook
Note:
Ch 3 is considered first dc throughout the pattern.
Ch 3 is considered first dc throughout the pattern.
Band:
Leave a long tail (4”) before making your beginning ch. This will be used to join the band of the hat.
Leave a long tail (4”) before making your beginning ch. This will be used to join the band of the hat.
Ch 6
Row 1: sc in 2nd chain from hook and in each remaining ch across, ch 1 turn (5 sc)
Row 2: sc in first ch and each ch across. (5 sc)
Row 3-72: Repeat Row 2 until work reaches approx. 20”. Do not fasten off working yarn. The working yarn and tail should end opposite of each other. (See notes above if 72 rows doesn’t give you 20″).
Forming
Hat: (Multiples of 3)
Using 4’ tail and yarn needle, line up the two ends and whip stitch the seam and back loop stitches together to form the band. Insert the hook into the working yarn and begin the body of the hat.
Using 4’ tail and yarn needle, line up the two ends and whip stitch the seam and back loop stitches together to form the band. Insert the hook into the working yarn and begin the body of the hat.
Color B
Round 1: Ch 1 and sc evenly around, join with sl st to first sc. (72 st)
Round 1: Ch 1 and sc evenly around, join with sl st to first sc. (72 st)
Color A
Round 2: ch 3, dc in next st and each st around, join with sl st in top of 3rd ch. (72 st)
Round 2: ch 3, dc in next st and each st around, join with sl st in top of 3rd ch. (72 st)
Round 3: ch 1 and sc in first st and each st around, join with
sl st in first sc. (72 st)
Color B
Round 4: ch 1, (sc, ch 3, 3-dc puff st) in first sc, *skip next 2 sc, (sc, ch 3, 3-dc puff st) in next st*, repeat from *to*, join with sl st to first sc. (72 st)
Round 4: ch 1, (sc, ch 3, 3-dc puff st) in first sc, *skip next 2 sc, (sc, ch 3, 3-dc puff st) in next st*, repeat from *to*, join with sl st to first sc. (72 st)
Color A
Round 5: sl st in ch 3 sp, ch 3 (counts as first dc here and throughout the pattern), 2 dc in same sp, 3 dc in next ch 3 sp and each ch 3 sp around, join with sl st to top of 3rd ch. (72 st)
Round 5: sl st in ch 3 sp, ch 3 (counts as first dc here and throughout the pattern), 2 dc in same sp, 3 dc in next ch 3 sp and each ch 3 sp around, join with sl st to top of 3rd ch. (72 st)
Color B
Round 6: ch 1 and sc in same sp, sc in next st and around, join with sl st to first sc. (72 st)
Round 6: ch 1 and sc in same sp, sc in next st and around, join with sl st to first sc. (72 st)
Rounds 7 – 16 – Repeat Rounds 2-6.
After Round 16 your hat will measure approximately 7” in height.
Color A
Round 17: ch 1 and sc in first st and each st around, join with sl st to first sc. (72 st)
Round 17: ch 1 and sc in first st and each st around, join with sl st to first sc. (72 st)
Round 18: ch 1 and sc in same sp, sc in next 3 st, sc2tog,
*sc in next 4 st, sc2tog*, repeat from *to*, join by sl st in first sc (60 st)
Round 19: ch 1 and sc in first st and each st around, join with
sl st to first sc. (60 st)
Round 20: ch 1 and sc in same sp, sc in next 2 st, sc2tog,
*sc in next 3 sc, sc2tog*, repeat from *to*, join by sl st in first dc (48 st)
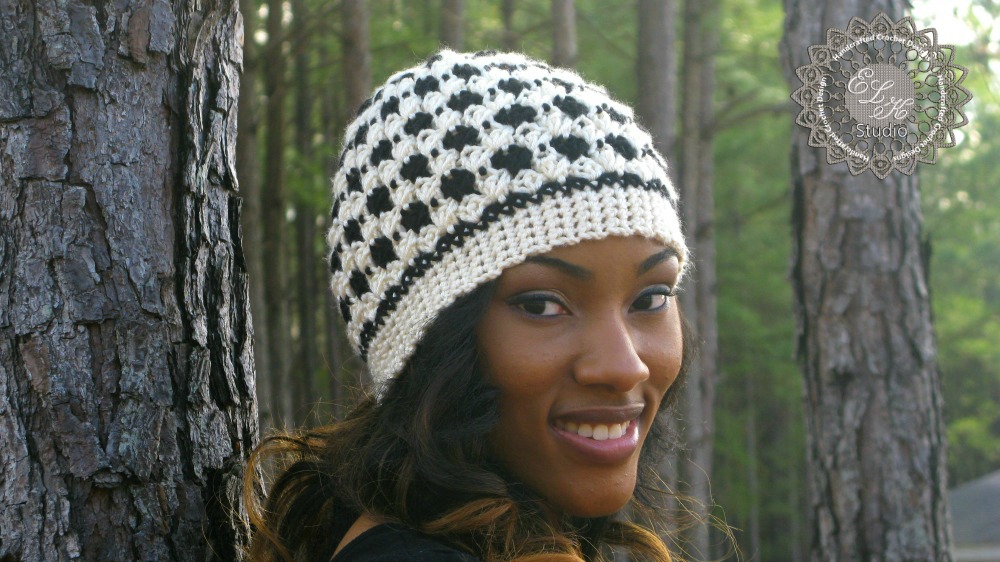
2a1 
Abbreviations:
ch – chain
dc – double crochet
fpdc – front post double crochet
sc – single crochet
sc2tog – single crochet 2 together
sl st – slip stitch
dc – double crochet
fpdc – front post double crochet
sc – single crochet
sc2tog – single crochet 2 together
sl st – slip stitch
Notes: In the pattern,
I always will tell you to sl st in the last stitch. Watch for the instructions in one of the rounds because it will
begin with telling you to also sl
st in the next stitch. This is CORRECT and will help you be successful with
the pattern.
Band:
Leave a long tail (4”) before making your beginning ch.
This will be used to join the band of the hat.
Ch 6
Row 1: Sc in 2nd ch from hook and in each st across, ch
1 turn. (5 st)
Row 2: sc in first sc and each sc across, ch 1 turn (5 st)
Row 3 – 72: Repeat row 2
At the end of row 72 do not cut the yarn. Take you
tapestry needle and join the ends of your rows using the whipstitch
method. Insert your hook once again and begin with round 1.
Body
of hat:
Round 1: sc evenly around, sl st to first sc (72st)
Round 2: ch 1 and sc in same sp, *skip next sc, 3 dc in
next sc , skip next sc, sc in next sc*, repeat from *to*, join with sl st to
sc.
Round 3: Ch 1 and 3 fpdc around sc in the round below,
*skip next dc, sc in next dc, skip next dc, 3 fpdc around sc in round below,
repeat from *to* sl
st to first sc,
Round 4: sl
st in next dc, ch 1 and sc in same sp, skip next dc, *3 fpdc
around sc in round below, skip next dc, sc in next dc*, repeat from *to*, join
with sl st to first sc.
Round 5-16: repeat rounds 3 & 4
Round 17: ch 1 and sc
in same sp, sc in next st and around, join with sl st to first sc. (72st)
WE WILL NOW BEGIN TO
DECREASE:
Round 18: ch 1 and sc in same sp, sc in next 3 dc, sc2tog, *sc
in next 2 dc, sc2tog*, repeat from *to*, join by sl st in first sc (60 st)
Round 19: ch 1 and sc in same sp, sc in next 2 sc, sc2tog,
*sc in next 3 sc, sc2tog*, repeat from *to*, join by sl st in first sc (48 st)
Do not fasten off. Measure out enough yarn to weave
through every other sc. I’m an overachiever and probably cut around 20”
of material.
Take your tapestry needle and weave under the loops of every
other sc around, pull the yarn tightly. This will close up the hat.
Sew the top of the hat with a few stitches for security. Fasten off.
Optional
Round: Holding the hat upside down, insert hook into bottom row
and form a sl st, ch 1 and sc in same st, sc in each st around, join with sl st
to first sc. (72st)
Crochet 2 rounds using the same color then
alternate the color on the next round. So, crochet rounds 2 and 3 using the same color
yarn and change your color on round 4.
Optional Round: Holding the hat upside down, insert hook into bottom row and form a sl st, ch 1 and sc in same st, sc in each st around, join with sl st to first sc. (72st)


4.

5.
6.


7.


